Android is a modified Linux kernel-based open-source cell working system developed and designed for touchscreen mobiles like smartphones and pill units. With loads of developer help, customizations, and a widespread person base, Android OS has turn into some of the common cell OS on this planet. Android 13 is the most recent iteration by Google, and now you can obtain the most recent Android 13 Customized ROM with the assistance of the supported machine record under.
As Android is very optimized and customization-friendly with customized firmware (Customized ROM) developed by many devoted customized firmware builders, it’s fairly widespread & straightforward for Android customers to flash a third-party aftermarket ROM on their units. It requires flashing information, required recordsdata or instruments, suitable machine mannequin, and base Android OS model, which must be working on the machine earlier than flashing.
An enormous because of the open-source platform of Android for seamless customizations and AOSP (Android Open Supply Challenge) supply code can simply do the job when it comes to customized firmware growth & flashing. It’s price mentioning that Google (Android Builders) releases Supply Code (AOSP) after publicly releasing the official steady model of the most recent Android OS. As talked about, Google has launched the Android13 DP construct not too long ago.
Android 13 and Its Options
Android 13 is the most recent steady model of Google’s Android working system, succeeding Android 12. It brings many new options and enhancements, together with enhancements to close by machine permissions, a redesigned picture picker, dynamic theming with icons, fast entry to QR code scanning, flashlight controls, and a revamped audio output format.
Even when your Android machine isn’t formally slated to obtain the Android 13 replace or anticipate a delayed rollout, you may nonetheless take pleasure in an early style of Android 13 by way of AOSP customized firmware, because of Challenge Treble help. This characteristic is obtainable on units working Android 8.0 Oreo or later. So, no matter your machine’s standing, you may discover the thrilling adjustments and enhancements that Android 13 has to supply.
With Android 13, you may count on a smoother and extra feature-rich expertise in your Android machine, making it price exploring even when it isn’t among the many first to obtain the official replace.
Why Customized ROM?
Google has carried out the Challenge Treble help for non-Pixel Android units which has been relevant for Android 8.0 Oreo or increased OS working fashions to simply flash the GSI (Generic System Picture) file to get an early style of the newly launched Android OS. Because the title suggests, a Customized ROM is an aftermarket third-party firmware file that may be developed by a customized firmware developer for particular machine fashions relying on the area.
It features a vanilla model of the precise Android OS with quite a lot of customization choices. There is no such thing as a higher various to Android OS with regards to flashing recordsdata, putting in root entry, putting in modules, altering visible components, booting to fastboot or restoration, and many others. Though customized firmware is susceptible to dangers, crashes, stability points, and many others than inventory firmware, loads of Android followers are extra thinking about having customized firmware on their units.
Likely as a result of it has virtually zero bloatware put in, a recent & clear person interface, maximized customization choices straight from the system settings menu, and extra. Now, in the event you’re thinking about Android 13 customized firmware then you may comply with this information fully.
Android 13 Customized ROM Supported Machine Checklist:
Steps to Set up Android 13 Customized ROM on Any Android Machine
You’ll should comply with up on a few of the necessities earlier than heading over to the firmware flashing steps.
Pre-Requisites
- To start with, create a backup of all the info in your machine.
- Subsequent up, you’ll have to unlock the bootloader in your Android machine. For that, chances are you’ll confer with our information on Unlock Bootloader by way of Fastboot Methodology on Android. We even have OEM particular unlocking tutorials that you would try:
- Obtain and set up the Android SDK Platform Instruments. It will offer you all the mandatory binary recordsdata.
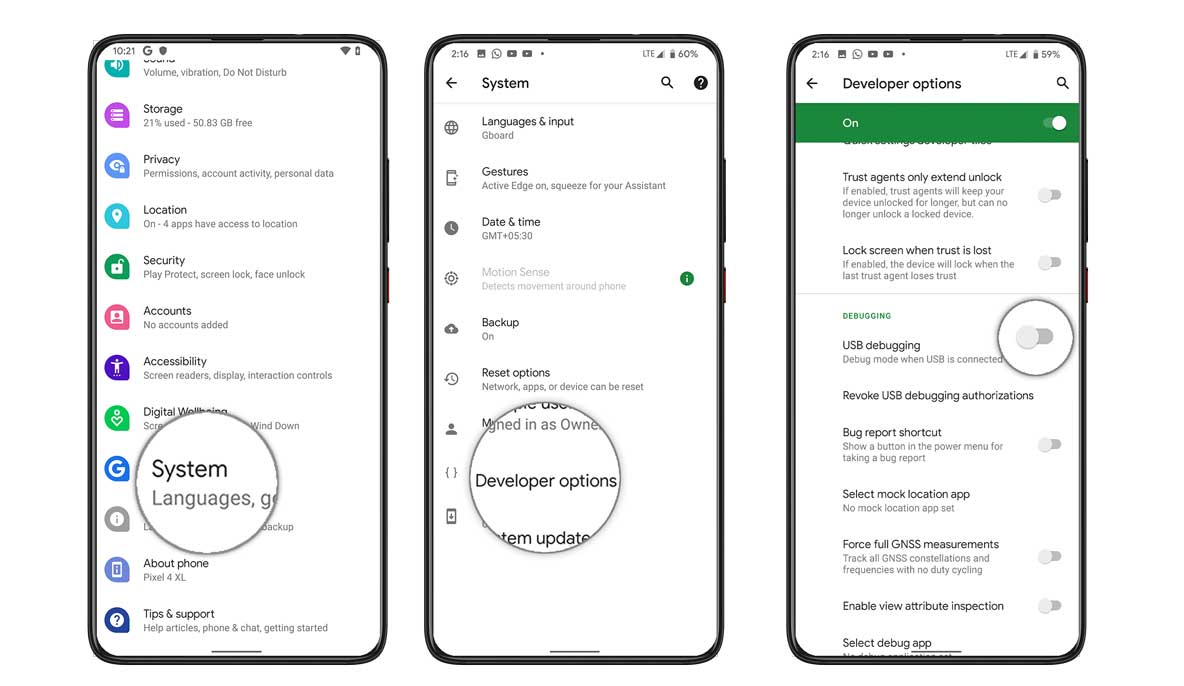
- Allow USB Debugging in your machine. It will make your machine recognizable by your PC in ADB mode. So head over to Settings > About Cellphone > Faucet on Construct Quantity 7 instances > Return to Settings > System > Superior > Developer Choices > Allow USB Debugging.
- Likewise, obtain and set up your machine’s USB drivers: Obtain Android USB Drivers for Home windows and Mac.
- Your machine ought to have the TWRP put in. That is wanted to put in the AOSP Android 13 Customized ROM. So confer with our information on Flash TWRP Restoration on any Android Cellphone and set up the mentioned customized restoration immediately.
- Moreover, not each ROM comes preloaded with Google Apps. In case your ROM belongs to that record, then you’ll have to obtain the GApps package deal individually after which switch it to your machine.
Set up Steps
- Switch the downloaded AOSP Customized ROM to your machine. Then join it to the PC by way of USB cable.
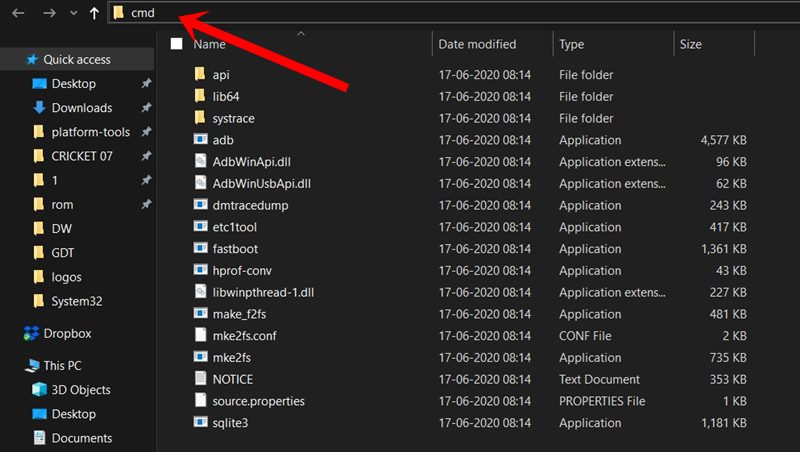
- Head over to the platform-tools folder, sort in CMD within the handle bar, and hit Enter. It will launch the Command Immediate.
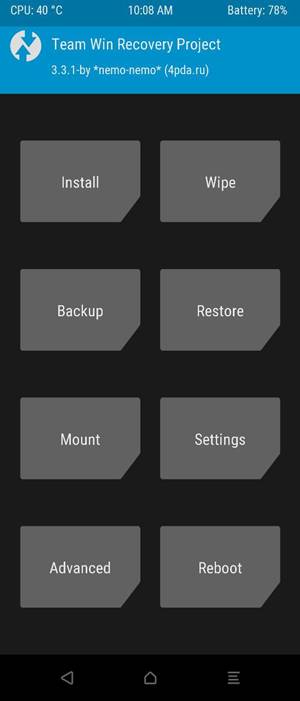
- Now, sort within the under command as well your machine to the TWRP Restoration:
adb reboot restoration
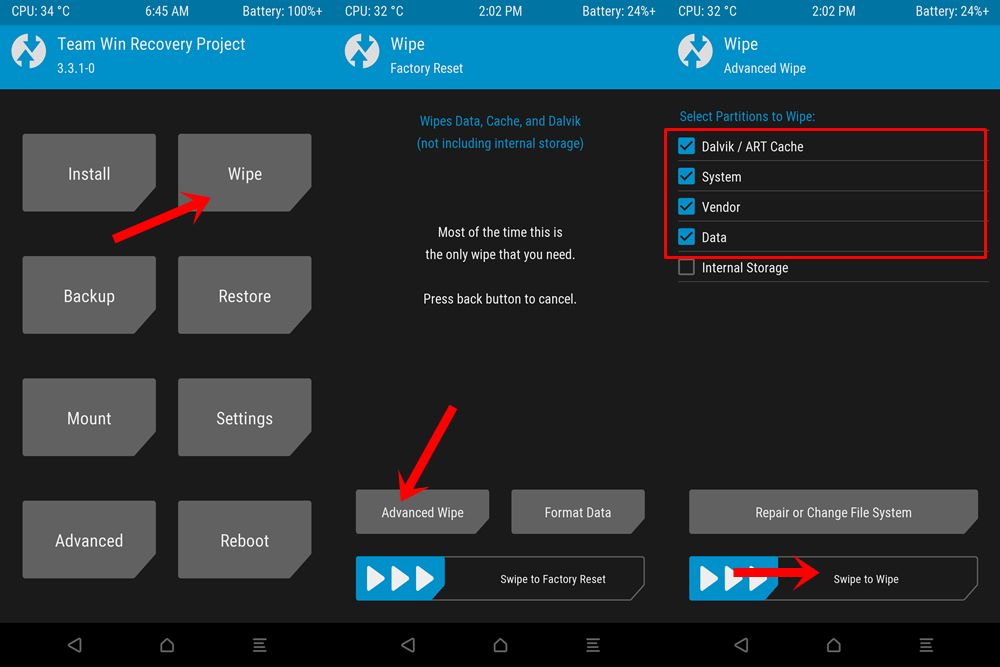
TWRP Fundamental Menu - When your machine boots to TWRP, head over to Wipe. Then faucet on Superior Wipe and choose Dalvik Cache, System, Vendor, and Information. Carry out a proper swipe to wipe the chosen partitions.
- As soon as that’s carried out, return to the TWRP house display screen and choose Set up. Then navigate to the AOSP Android 13 Customized ROM and choose it.
- Carry out a proper swipe to flash this file. When that’s carried out, once more head over to Set up and this time flash the GApps package deal (elective).
- You could now reboot your machine to the Android OS. For that, go to Reboot and faucet on System.

Until then keep tuned for more information. You possibly can bookmark this web page to maintain checking the up to date information. We’ll gonna embrace each attainable Android 13 Customized ROM relating to particulars at any time when accessible. For additional queries, tell us within the remark under.